Showing posts with label recipes. Show all posts

Sunday, March 11, 2012

The BEST Brownie Recipe - goodbye Betty Crocker!

 I have tried SO many brownie recipes to try and find the perfect brownie recipe for my sister.
She's a boxed brownie fan and it seemed like nothing as going to steer her from Betty Crocker. 
You see, she's the Goldilocks of brownies.

These ones are too cakey
Those ones aren't dense enough
They just aren't the same

But you know what? these brownies are jusssssssssssssssssssst right!
I finally came up with the best brownie recipe and Betty Crocker got the boot!


These brownies are super simple to make and only require a mixing bowl. 
It's a small batch recipe, making 16 small or 9 large brownies so feel free to double it! 

The Best Brownie Recipe
also known as the only brownie recipe you'll ever need 
makes 16 small/9 large brownies

115g butter, melted 
1C brown sugar
1 tsp vanilla extract
2 eggs
1/2C flour 
1/3C cocoa powder
1/4 tsp baking powder

Preheat oven to 180*C/350*F
Grease and line 9x9'' brownie tin.
Combine melted butter, brown sugar and vanilla in a mixing bowl.
Once butter mixture is cooled slightly, add eggs and stir until mixed through
Mix in flour, cocoa powder and baking powder until well combined.
Pour into tin and bake for 20-25 minutes, or until a skewer removes clean.


This brownie recipe is super simple to adapt, 
I added Reese Peanut Butter Chips but you can add nuts/chocolate/chopped candy bars or whatever you fancy!
They're delicious on their own or with a creamy chocolate frosting on top - it's up to you! 

So tell me - your dream brownie, what's it like?
Chewy? Fudgy? Cake-like? Nut filled? Super rich?
 Pin It

Sunday, February 26, 2012

Recipe: Soft Instant Oatmeal Cookies


Our new blog can be found here.

There's nothing quite like a freshly baked cookie, warm from the oven.
Some people like them crisp and crunchy, some love a chewy cookie and others prefer a softer cookie.
I was lucky enough to be sent some instant oatmeal packs from Nature's Path, as well as the other cereals, and I knew just what I was going to do with some of them! 
Make cookies, of course!


The Nature's Path Oatmeal comes in 3 flavours, 
Original which is simply pure oats with a pinch of sea salt
Apple Cinnamon which contains chunks of dried apple and a hint of cinnamon
Maple Nut which has crunchy hazelnuts and a delicious maple flavour. 

The individual sachets make for a quick and easy hot breakfast 
and the 50g portions are the perfect amount for a filling meal.
Just pop them in a bowl in the microwave with 1/2-2/3C of water, stir and cook for 75 seconds or so.
To make them extra creamy, cook them in a mix of milk and water, adding a dash of milk at the end.

They're the perfect base for whatever toppings you desire, or eaten on their own!


But, back to the cookies!
These cookies are the ultimate quick and easy soft oatmeal cookie that are the perfect base for any addition you want to make. 
I went the traditional route and added raisins to half of my batch, however, they work perfectly with choc chips, nuts, dried fruits or just about any other mix ins you'd find in a cookie!

Soft and Simple Instant Oatmeal Cookie Recipe
makes 1 dozen large cookies
or 2 dozen smaller cookies 

 1C plain flour
1C instant oats
1C brown sugar
2 tbsp boiling water
1 tsp bicarb soda/baking soda
120g butter, chopped
1 tbsp maple syrup

Preheat oven to 180*C. Line 2-4 baking trays with baking paper (depending on cookie size)
In a bowl, combine flour, oats and brown sugar. 
Dissolve bicarb soda in boiling water and set aside.
In a small saucepan, stir butter and maple syrup over a medium heat until butter melts.
Take off the heat and stir in baking soda mixture, pour into dry ingredients and stir until well combined.
Roll heaped tablespoons (for large cookies) or heaped teaspoons (for small cookies) of the dough into balls, place 1 1/2 inches apart on the lined trays.
Bake for 10-12 minutes or until golden, set aside on trays to cool completely.

And there you have it, a batch of delicious fresh from the oven cookies!
Try not to eat them all in one go ;)


Our new blog can be found here.

So tell me, 
What's your ultimate cookie like?
and what are your favourite mix ins? 

Kristy received Nature's Path products courtesy of Kadac Health Foods (www.kadac.com.au) 

If you'd like a review of your products, send an email to ksayerphotography@gmail.com

Saturday, January 21, 2012

A super speed dinner solution!


I think everyone regularly has the problem where you're stuck for what you are going to have for dinner. 
You don't have much time or your fridge and pantry are looking pretty bare.. 

I thought I'd share a delicious recipe with you that might fix that problem for you, 
or maybe even inspire your dinner one night this week! 
This pasta dish is quick, easy and can use up whatever you have in your fridge. 


This dish was inspired by some products sent to me from Global Organics
Global Organics products are sourced worldwide to give you quality organic food in your kitchen for your every day use. 

Their tomato range includes;
tomato paste - perfect for adding a rich tomato flavour to dishes
pesto rosso - a delicious addition to sandwiches, pasta dishes, vegetables or whatever you fancy
tomato passata - a super easy base for pasta dishes or use in casseroles, as a pizza sauce etcetc.

Global organics also have the only Organic Black Beans on the market.
They're perfect for adding to mexican or latino style dishes and are packed full of fibre and antioxidants.


Global Organics traditional Italian style pestos are incredible - the basil pesto comes in two varieties, vegan pesto verde and basil pesto siciliano with the addition of delicious italian cheeses.
They're perfect for stirring through freshly cooked pasta for a simple meal. 
The pesto siciliano is most definitely my favourite and something I'll be sure to keep in my pantry.

Global Organics mustards come in both a wholegrain mustard and a strong dijon mustard
which make the perfect addition to sandwiches or served alongside roasted meat or vegetables. 


  Olive paste or tapenade, as it's also known, is perfect for serving as a tangy spread for fresh bread and vegetables or used as an addition to cheese plates or to give your meals a burst of flavour

Global Organics Maple Syrup is delicious. 
It's pure maple syrup, unlike the artificial Maple "flavoured" syrup you can find, so it has a delicious full flavour that's perfect for topping pancakes, ice cream or using in desserts.
It's even great with savoury dishes, try roasting carrots or vegetables in some maple syrup for a change!


 But back to the pasta, you want the recipe - right?! 
Well here it is! Remember, you can easily adapt it to suit whatever you have on hand at the time!

Super Simple Southwestern Black Bean Pasta
1 can black beans, drained and rinsed
1 1/2 - 2C tomato passata
1 tbsp olive oil 
1 clove of garlic, minced
1 small onion, finely diced
Optional: any vegetables you might have in your fridge - carrots, celery, capsicum etc.
1 1/2 tsp cumin 
1 tsp dried oregano
Mexican chili powder, to taste
Salt and pepper, to taste
250g pasta, cooked al dente and drained (this can be increased/decreased to suit how many you're serving)
Grated cheese/coriander/shallots to top 

In a medium saucepan, saute onion over a medium high heat until soft. 
Add garlic and spices and saute for a further minute.
Stir in the tomato passata, gently stir through black beans. 
Add pasta to the pan and toss through the sauce.
Add your desired toppings and enjoy! Simple as that.

Now, can you get any easier than that?! 
The Global Organics range is available at a number of stockists around the country, to find the closest to you check here! 

So tell me, 
on rushed nights what's your go-to meal? 

Kristy received Global Organics products courtesy of www.globalorganics.com.au
If you'd like a review of your products, send an email to ksayerphotography@gmail.com 


Monday, January 16, 2012

Back, with breakfast!

Why hello there! 
I've been missing from here for a while now and I'm sorry!
Don't worry though, I haven't fallen off the face of the earth and I'm not dead - I've just been veeery busy. 

I was recently reminded that I need to spend more time with my loved ones as well as helping them out wherever possible.
My sister had an almost one month stint in the hospital (and was even interviewed by Kyle and Jackie O)
and I became the stand-in mum - washing/cooking/cleaning/you name it - as well as trying to be at the hospital as much as I possibly could.

Because of that (and my incredible boyfriend coming for Christmas) I decided to take December off completely. 
No work, no blogging, no plans.

It's been incredible to relax and spend some serious quality time with my family 
but I've been getting a little restless (and it wasn't ants in my pants!) and feeling the need to be productive once again - SO I'M BACK!

So for my first blog post of 2012, I wanted to share my favourite breakfast with you. 
It's gluten free, DELICIOUS!, super easy and perfect for weekends or that special treat.
It can also be made in advance and frozen so you can have a yummy baked breakfast any day of the week!


Banana Buckwheat Bake
gluten free, can be vegan, can be eggless and totally personalisable.
Adapted from Ashley @ The Edible Perspective 

1/4 cup buckwheat flour
1 tbsp Buckwheat groats (see notes
1 tsp vanilla extract
1 tbsp Milk (whatever you like)
1 medium banana
1 egg/1 chia/flax egg/egg replacer (see notes)
1/2 tsp baking powder
1/2 tsp baking soda
pinch of salt

Optional: spices/chocolate chips/cocoa powder/fresh fruit/dried fruit/nuts/whatever you fancy

Preheat oven to 190*C. 
Mash 3/4 of the banana, leaving 1/4 aside to slice and add to the top - Mix in milk and vanilla. 
Add buckwheat flour, groats, baking powder, baking soda and salt to wet ingredients and mix until combined.
Pour mix into a non-stick baking pan (single serve), slightly greased ramekin or muffin cups. 
Top bake with banana slices and bake for 30-40 minutes until cooked through.

Then add whatever toppings you desire - I love adding nut butter, cream cheese, yogurt or fresh fruit - it's up to you!

Make sure you view my new blog, Southern In-Law for lots of delicious healthy recipes

Notes: 
Buckwheat flour is readily available at supermarkets as well as health food stores, or you can grind your own from raw buckwheat groats/kernels
Raw buckwheat groats are also readily available at supermarkets/health food stores. Sometimes you'll find them labelled as "buckwheat kernels" or "buckwheat grain" - just make sure you get the RAW version not the toasted kind. 
Chia/flax egg - Whisk 1 tablespoon chia seed/bran or ground flaxseed and 2 tbsp warm water until it "gels" and has an egg-like consistency.
If you like things sweet add in some maple syrup/honey/sugar to your tastes
If you don't have buckwheat it works fine with oats - just use oat flour (ground from oats) and whole rolled oats instead of the buckwheat flour/groats. 
So there you have it! The best breakfast you will ever make!


But do tell me, 
How was your holidays?
and What's your ultimate breakfast?  
Pin It
 

Thursday, November 24, 2011

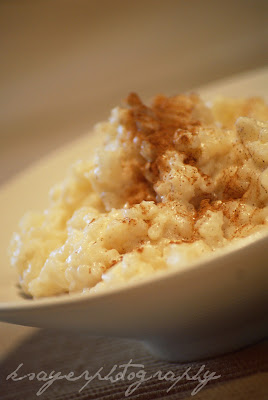
Comfort Food Recipe: Quick Stove top Rice Pudding


Cold, dreary weather always leaves me wanting warm food to warm me from the inside out. 
Rice pudding is one of these foods that leave you feeling all cozy and snug,
however, the baked version can leave you waiting for hours!

Lately, Sydney has been having unseasonably cold, wet and dreary days.
This called for a steaming hot batch of rice pudding to warm up my family.
Plus, it gave me an excuse to stand close to the hot stove and warm up.

This recipe is super easy and is perfect for any time. 
It uses ingredients that you most likely have lying around your kitchen, so it's fantastic for a last minute dessert or a lazy day. 

Stove top Rice Pudding
Serves 4

100g long grain rice 
2C milk (you can use whole/light/skim/whatever)
1-2 tbsp sugar (depending on tastes)
2 tsp vanilla extract
1/4 tsp Cinnamon (or more/less/different spices - depending on tastes)
1C milk 
Optional: a touch of cream

In a medium saucepan, add the rice, 2 cups of milk, sugar, cinnamon and vanilla extract and bring to the boil. 
Cover and reduce to a low heat, leaving the rice to simmer for 15 minutes - stirring every now and again. 
Add in the 1 cup of milk and bring the heat up to high. 
Stir the rice constantly for around 7 minutes, until your desired consistency is reached - let the milk absorb fully for a thicker pudding or leave some milk for a creamier pudding. 
If using, stir in the cream . Transfer the pudding to bowls or a serving dish and leave to cool slightly before serving.

Tell me, 
What's your comfort food of choice?
or go-to cold weather dish? 
 Pin It

Wednesday, November 2, 2011

Granola Breakfast Muffins and a bunch of breakfast goodies!

Breakfast is by far my favourite meal of the day.
I can't understand how people can say they just don't like breakfast.
If I started without it, I'd probably be a zombie for the rest of the day.

So, as you could imagine, I was super excited to receive the package from realgoodfood,
filled with breakfast goodies as well as a whole bunch of other fantastic products. 
So many products, in fact, they won't fit into the one post!
Plus, I also have a delicious recipe for you at the end of the post!


The Organic Oat Porridge is a Wheat Free Mix of Biodynamic and organic rolled oats, sultanas, apple and cinnamon.
It has no added oil, sugar or salt and is GMO free!


It can be made hot on the stove (or in the microwave) as a porridge, 
but now as the weather is warming up, I love to use it as a base for overnight oats!
Just mix up the oat porridge with milk or yogurt (or a combination of both) and leave it to soften in the fridge overnight.
In the morning, all you have to do is pull your breakfast out of the fridge, add any extra toppings you might like and eat up!
Fast, easy and delicious :)

The Choc Berry Street Mix is a fantastic snack to keep around and it's also Gluten Free!
This organic snack mix is filled with sultanas, almonds, cranberries, blueberries, goji berries, sunflower seeds, pumpkin seeds and delicious dark chocolate pieces.
The mix also makes a fantastic topping for oatmeal or overnight oats!


The Organic Street Mix is also gluten free 
 and filled with organic sultanas, almonds, sunflower kernels and pumpkin seeds.
It's a perfect on the go snack for when the hunger monster attacks!

The Organic Bircher Muesli is a wheat free mix of organic & biodynamic rolled oats, sultanas, dried apple, almonds and sunflower kernels.
Bircher muesli is a lot like overnight oats, some people like to soak theirs in fruit juices or water and top with milk or yogurt the next day, while others prefer to use milk or other combinations.
Ultimately, the decision is yours! Play around with different combinations until you find what you like!

You can get realgoodfood products from a variety of stockists across the country!


 Now, the recipe I promised!
As soon as I opened the Organic Toasted Muesli I was hit with the delicious aroma of honey and new it'd be perfect in baked goods!
It's a mix of organic & biodynamic rolled oats, sultanas, honey, sunflower kernels, almonds, barley malt, pear juice and orange.
It's delicious eaten as a cereal, but I decided I wanted to make a way for busy breakfast-haters to enjoy it too!

Thus, the breakfast muffin was born!
It's a perfect on the go breakfast that's fuss free and delicious!
The recipe is also completely adaptable, so it's easy to whip up with whatever you have at hand.


Muesli Breakfast Muffins 
makes 12 muffins or 6 extra large muffins


2 1/2C Flour (you can use white/whole wheat/GF/spelt)
2/3C Sugar (choose whatever sugar you prefer - white/brown/raw etc)
1C toasted muesli/granola + extra for topping
1 egg
1C fruit* 
1/4C vegetable oil 
1 1/4C milk 

Preheat oven to 180*C. Grease/spray muffin tins with oil or line with paper cases.
Combine flour, sugar and muesli in a bowl. 
Mix together egg, vegetable oil and milk and pour into dry ingredients. 
Stir in fruit and mix until just combined. 
Pour muffin batter into muffin tins and top with a sprinkle of extra muesli. 
Bake for 20-25 minutes or until golden and a skewer inserted in the centre comes out clean.


*For the fruit, I used a cup of leftover pie apple from a pie I had made earlier - just cooked apples mixed with a pinch of brown sugar and cinnamon 
You can use any fruit you like canned, fresh or frozen apple/pear/peaches/pineapple/blueberries etc.


So tell me, 
Are you a breakfast lover?
What's your go-to breakfast of choice?

Stay tuned for the other half of my review! It's packed full of delicious gluten free goodies :)

Kristy received these products courtesy of www.realgoodfood.com.au
If you'd like a review of your products, send an email to ksayerphotography@gmail.com 
Pin It
 

Wednesday, October 26, 2011

Looking for a last minute Halloween treat?: Swirled Bundt Cake

Halloween is this coming Monday - are you ready?!
In recent years, Halloween has become more popular in Australia, with carving pumpkins stacked in big crates at the supermarket and costumes selling like hot cakes.

I decided to make a Halloween themed Bundt cake to kick off the holiday early.
This cake is perfect for Halloween parties and is super simple!
I mean, really, eating brains just isn't my thing - nor is spending the entire weekend slaving away in the kitchen over halloween themed treats.
Plus if you get an invitation last minute, this cake is your best friend!


Vanilla Bundt Cake Recipe
makes 1 large bundt cake

250g butter, softened
1 3/4C sugar
2 tsp vanilla
4 eggs 
3C plain flour
1 tsp baking powder
1/2 tsp baking soda
1C buttermilk*  

Preheat oven to 180*C (350*F)
Cream butter and sugar until light and fluffy.
Add in vanilla and eggs one at a time until combined.
Add in flour and milk alternatively, with mixer on a low speed, until just combined.
Separate half of mixture into a clean mixing bowl.
Colour one batter bowl with purple food dye (or a combination of blue and red dyes) and the other with orange dye (or yellow and red) - the colours should be really bright as they will fade during cooking.
Pour in 3/4 of the purple batter into the bundt tin, being sure to cover the entire base.
Gently pour the orange batter on top of the purple batter, towards the center, leaving about 1 cm of the purple batter on the edge.
Pour in the remaining purple batter, trying to cover as much of the orange as possible.
Place the filled bundt tin into the oven and bake for ~ 1 hour, until the tip of a knife or skewer inserted into center of cake comes out clean.
Leave cake to cool before turning out and leaving to cool completely on a wire cooling rack.

*If you don't have buttermilk, you can use milk soured with 1 tsp white vinegar or lemon juice

Drippy Milk Chocolate Glaze
200g Milk Chocolate 
2-3 tsp Vegetable Oil 
(the oil will depend on the chocolate, add as much as needed to get a slightly runny consistency)

Melt chocolate and oil on a low heat until completely melted.
You can do this on the stove (bain marie technique) or in the microwave - just be sure not to burn the chocolate!
Place the cooling rack with the cooled cake ontop of a lined cookie sheet and pour the chocolate glaze on the top of the bundt cake, allowing the glaze to drip down the sides. 
Leave cake to set at room temperature or in the fridge (if you're impatient!) 

and there you have it! easy as easier than pie! 


So tell me! 
Do you celebrate Halloween?! 
What are your plans this year?
Pin It

Saturday, October 1, 2011

Recipe: Key Lime Pie Cupcakes


When your Mum comes home from a trip to your Grandmother's house with a big bag of fresh limes,
What do you do?
You switch on your brain and start figuring out what you're going to bake with them, of course!

While I may have given up gluten for now, you don't think I'd stop baking - did you? 

The first thing that came to mind when I saw the limes was key lime pie,
but lately I've made quite a few pies so I felt like making something different.
I remembered I hadn't made cupcakes for a while and then the idea hit me...
Why not take a Key Lime Pie and turn it into cupcakes?

Then I set off to create Key Lime Pie Cupcakes or Lime Meringue Pie Cupcakes - whichever name you fancy.
I took my favourite, tried and tested Vanila Cupcake recipe,
made a simple lime filling and topped it off with a soft meringue.

For something that looks a little fancier than your average cupcake and will wow your guests,
it's delightfully simple - just how I like it!


Key Lime Pie Cupcakes 
recipe by ksayerphotography
Makes 12 cupcakes

Vanilla Cupcakes:
125g Butter, softened 
2/3C + 2 tbsp Sugar
2 Eggs 
1/2C Milk 
1/2 tbsp Vanilla Extract
1 1/3C Plain Flour 
3/4 tsp Baking Powder
1/4 tsp Salt

Preheat oven to 160*C (320*F).
Beat butter and sugar until light and fluffy. 
Add in eggs one at a time, beating for a minute after each egg. 
In a bowl combine milk and vanilla.
In a separate bowl combine flour, baking powder and salt. 
With a mixer on low speed, alternatively add the flour and milk mixtures until all is combined. 
Beat for a further 3 minutes on high.

Divide into lined cupcake pans and bake for 20-30 minutes or until golden and a skewer inserted into the middle comes out clean.
Using  piping nozzle, skewer or small knife make a hole in the top of the cupcakes for the filling.
Allow to cool in the pans for 10 minutes before removing to cool completely on wire racks.
Key Lime Filling:
100g Condensed Milk
1.5-2 Tbsp Fresh Lime Juice  
(this depends on your taste preference and the strength of your limes)
Mix condensed milk and lime juice together until combined and desired flavour is reached. 
Fill/pipe filling into cooled cupcakes.

Meringue Topping:
2 Egg Whites
50g Caster Sugar
Pinch of Salt

Preheat oven to 230*C (450*F)
Beat the eggs and salt until soft peaks form.
Gradually add the sugar and beat until stiff peaks. 
The mix should be thick and glossy and the sugar should be completely dissolved.
Pipe onto cooled and filled cupcakes and bake for 5 minutes until meringue is golden.
...

And there you have it! 
It seems a bit more complicated than it actually is, but trust me, it's as easy as... well, pie!

Tips:
- Add the lime juice gradually and taste as you go so you don't add too much!
- It's easier to cook the meringue topping if you place the cupcakes back into the cleaned cupcake tins
- This recipe can be easily adapted! Switch the lime juice for lemon, fill them with chocolate or caramel instead - the possibilities are endless!

So tell me -
Do you have any favourite recipes using lime?

Thursday, June 30, 2011

Cookie Mad: Double Chocolate Chip Cookies (Chocolate White Choc Chip)


our new blog can be found here.

So you might have guessed that lately I've been on a bit of a cookie kick.
They're portable, adaptable, easy to make andddd I have a family of cookie fiends.

I had a request for Double Chocolate Cookies (inspired by Subway's Double Choc Chip Cookies) 
so I got to work in the kitchen. 


But that's where the trouble started. 
The recipe I had was all sorts of wrong.

As I looked down the ingredients list, I realised that it just wasn't going to work.
No eggs. No wet ingredients. No raising agents.
Hmmmmmmmmmmm.

So what did I do? Improvise!
I figured in the last couple of months I've made enough cookies to at least try to bake completely on instinct.
So I crossed my fingers and went to work. 

Once the cookies were in the oven I spent the next fifteen minutes looking from my computer screen to the oven - hoping and praying they didn't turn into a tray of cookie lava or be a complete fail.
Thankfully they didn't do either - I had soft and chewy Double Chocolate Chip cookies that smelt amazing. 

Yes, I most definitely was proud of my baking skills - fluke or no fluke :P


Being the smart cookie I am (heh)
I also wrote down what I did so I could share the recipe with you if it was a success! 
These cookies have soft centres with chewy edges and are probably the love child of a cookie and a brownie. 
If you love the chocolatey flavour of brownies but just can't go past the old faithful cookie - these are for you. 

Double Chocolate Chip Cookies  Pin It
(Chocolate White Chocolate Chip Cookies) 
recipe by ksayerphotography 
Makes about 2 dozen cookies

125g Butter
1/2C White Sugar
1/2C Brown Sugar
1 tsp Vanilla
1 Egg
Pinch of Salt
1 1/4C Flour 
1 tsp Baking Powder 
1 tsp Baking Soda
2/3C Cocoa Powder
1/3C Milk
1 1/2C White Chocolate Chips (or as much as you prefer)

Preheat oven to 165*C/330*F 
Cream butter and sugar until light and fluffy, add egg and vanilla and mix until incorporated.
Add flour, raising agents, cocoa and salt and mix until combined.
Slowly add in milk (while mixing) until a soft dough forms.
Mix in chocolate chips until evenly dispersed throughout the dough.
Cover bowl and leave to chill in the fridge for at least fifteen minutes - or until firm and workable.

Roll heaping tablespoons of dough into balls and place on lined cookie sheets 2-3" apart.
Bake for 15-20 minutes until edges are cooked. 
Leave to cool completely on trays.

Tips!
- If you want a really chocolatey cookie, switch the white chocolate chips for milk or dark.
 
- For a crispier, crunchier cookie, bake for 20-25 minutes.
- The cookies will firm up once they cool, so don't worry if the middles seem soft. 
- Try adding dried fruit/nuts/more chocolate chips to make your ultimate cookie. 
- Don't try working with the dough before you chill it, you'll end up with a huge mess.
- The dough freezes extremely well, so why not make extras and pop them in the freezer for when the cookie monster hits! 


our new blog can be found here.

So tell me, 
Are you a chocolate or a vanilla kind of person?! 

I love chocolate straight up, on it's own.
If you offered me a cake or a piece of chocolate - I'd choose chocolate :P
Or anything sweet or a piece of chocolate, really.

Pin It

Love this recipe? Be sure to check out my new blog - Southern In-Law!